Testing Drupal projects with Behat in PhpStorm
Developers are known for their most famous topics to be testing and documentation - not. And I'm no different. However, the bigger my projects tend to get and the longer they last, the more this becomes a real issue so that even the developer in me starts to promote the idea of proper testing and documentation. And to cut a long story short: BDD (behaviour driven development) can deliver a significant part in both of these areas.
The purpose of this blog post is to demonstrate some best practices for testing Drupal projects with Behat for developers using PhpStorm (or any equivalent IDE from JetBrains like e.g. IntelliJ IDEA). There are plenty of articles, tutorials and blog posts available on this same topic and you will find some of the links below. The requirement for this additional post was driven by my own experience that an efficient setup, test architecture and automation has not yet been described from start to end. So, the below tutorial reflects my very own and personally preferred way of utilizing those great tools and I'd never be surprised if anyone came up with some different ways of doing it. In fact, I'd be interested in learning about them.
Why Behat?
The preference has been on PHP at first and looking around at possible frameworks, PhpSpec, Codeception and Behat turned out to be great candidates for the job. The fact that we intended to test Drupal projects only and that there is a well maintained Drupal extension for Behat around that also integrates Drush into the framework made the choice quite easy and none of the tests with any of the three platforms brought up any huge arguments for one of the others. Last but not least, the Behat integration into PhpStorm also works really nice so that everything got integrated nicely and turned out to be a perfect fit for our working environment.
Installation
Here is a step by step instruction on how to get all the components installed. The command line instructions have been tested on Ubuntu 15.04 but should be more or less the same for other platforms too.
Install Composer
This is optional and only required if composer is not yet installed on your system:
sudo curl -s https://getcomposer.org/installer | sudo php
Just to make sure that your composer is properly updated and as current as possible you should run
sudo composer self-update
Especially if it was already installed on your system.
Define Requirements
Next we are telling composer which components we do require for our test environment:
sudo composer global require behat/behat ~3.0.15
sudo composer global require drupal/drupal-extension ~3.0
sudo composer global require feature-browser/feature-browser ~1.0
sudo composer global require drush/drush ~7.0
sudo composer global require ciaranmcnulty/behat-stepthroughextension dev-master
Finally, get composer to install (or update) all the required components:
sudo composer global update
This may take a while, go and get a cup of coffee it'll get exciting soon.
Configuration
Before we get to configure the IDE, let's make sure that PHP can cope with it and there is a tiny little change that's required to your php.ini:
xdebug.max_nesting_level = 1000
This is required as the default is set to 100 and that's not sufficient for Behat's needs.
Now it's time to get PhpStorm ready for Behat. You may want to look into JetBrains Blog Post on how to get started, but I found some additional steps that are really helpful if not required, so I quickly list them all so that you'll get a comprehensive list of all that's needed:
Enable Behat Plugin
Go to File > Settings and there open the section Plugins. Find the Behat plugin and enable it.
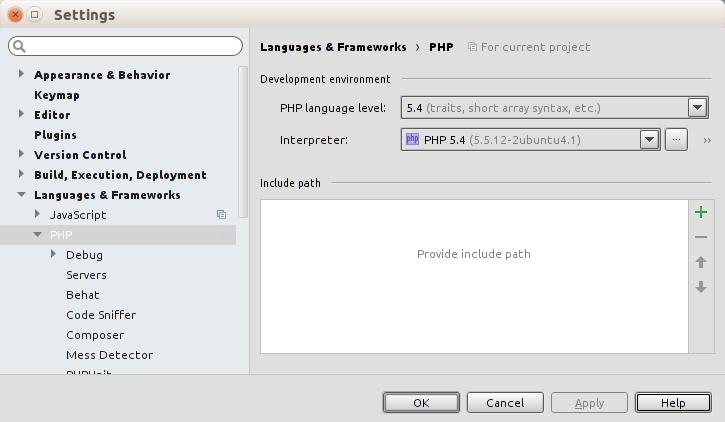
Specify PHP Intepreter
Go to File > Settings and there open the section Languages and Frameworks > PHP. Make your definitions about the language level and the interpreter you want to use in your project.
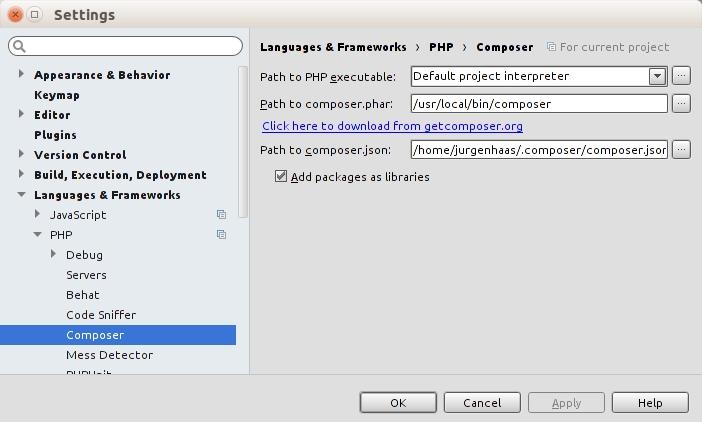
Configure Composer
Go to File > Settings and there open the section Languages and Frameworks > PHP > Composer. Specify the paths to your composer and your global composer.json file.
Add Libraries
Libraries are added in File > Project Structure and you should add all the installed Libraries like shown in the below sample.

Define Run Configuration
Before you can define your run configuration you should create a directory in your project which will be used for your test definitions. Inside of that directory you should create a file behat.yml which can stay empty for now, we'll deal with that later. Now, all is prepared to define your run configuration, you should find that in a drop-down of your toolbar called Edit Configurations... and you can add a new one and configure it like this:
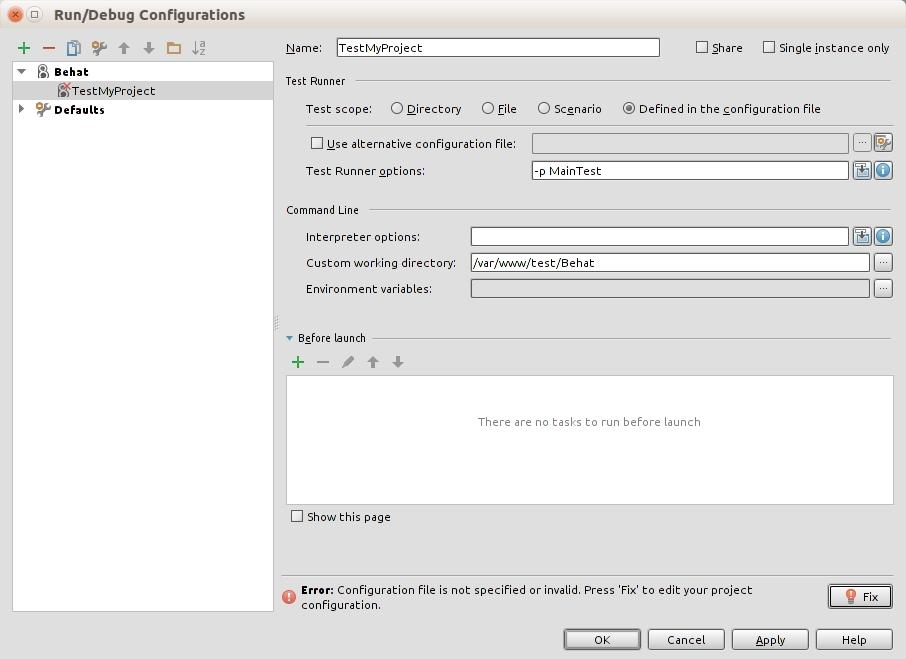
At the bottom you'll notice an error message and when you click on the Fix button, the final configuration can be provided:
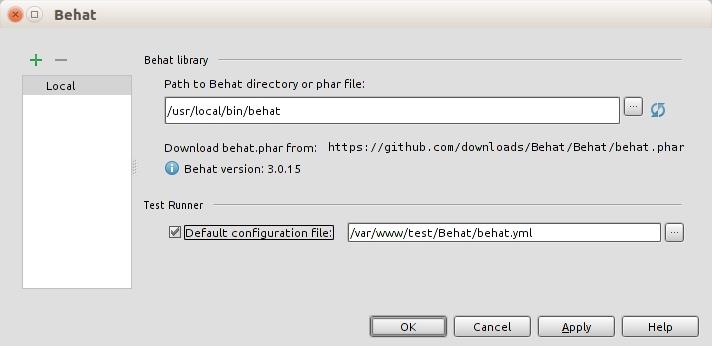
Click OK and again OK in the dialog underneath, now you're ready to go.
Writing Tests
In your test directory you should create a structure like the one shown here:
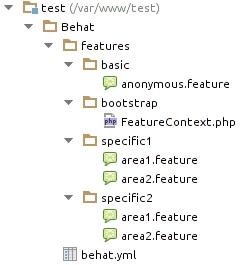
So let's discuss what's in those test definitions:
Main file behat.yml
default:
  suites:
    default:
      contexts:
        - FeatureContext
        - Drupal\DrupalExtension\Context\DrupalContext
        - Drupal\DrupalExtension\Context\DrushContext
        - Drupal\DrupalExtension\Context\MarkupContext
        - Drupal\DrupalExtension\Context\MessageContext
        - Drupal\DrupalExtension\Context\MinkContext
        - Drupal\DrupalExtension\Context\RawDrupalContext
  extensions:
    Behat\MinkExtension:
      goutte: ~
    Drupal\DrupalExtension:
      blackbox: ~
      api_driver: "drush"
      drupal:
        drupal_root: "/var/www/test"
      subcontexts:
        paths:
          - "/var/www/test/sites/all/modules"
      region_map:
        First sidebar: "#sidebar-first"
        Main content: "#main .region"
      selectors:
        message_selector: ".messages, #absolute-messages-messages"
        error_message_selector: "#absolute-messages-messages .absolute-messages-error, .alert.alert-danger"
        success_message_selector: "#absolute-messages-messages .absolute-messages-status .content, #status-message-container .messages.status, .alert.alert-success"
      text:
         log_out: "Log out"
         log_in: "Log in"
         password_field: "Password"
         username_field: "Username or e-mail address"

MainTest:
  suites:
    default:
      paths:
        - %paths.base%/features/basic
        - %paths.base%/features/specific1
  extensions:
    Behat\MinkExtension:
      base_url: "http://site1.localhost"
    Drupal\DrupalExtension:
      drush:
        alias: "site1"

SubTest:
  suites:
    default:
      paths:
        - %paths.base%/features/basic
        - %paths.base%/features/specific2
  extensions:
    Behat\MinkExtension:
      base_url: "http://site2.localhost"
    Drupal\DrupalExtension:
      drush:
        alias: "site2"
This is the main configuration of your test suite and that contains 3 profiles: default, MainTest and SubTest. The two usable profile MainTest and SubTest are using the default profile themselves and extend them with their specific settings.
Each of the profiles comes with a default suite which defines a list of paths which should be tested for each of those profiles. The MainTest is therefore uses all feature files in the subdirectory features/basic followed by all feature files in the subdirectory features/specific1.
This way you can write tests in the basic directory that will be used for each profile and in each of the specific directories just write those tests for some of the profiles.
All other settings in the behat.yml file are fully documented in the documentations for Behat and the DrupalExtension and we won't repeat them here for simplicity reasons.
Context file FeatureContext.php
use Behat\Behat\Context\SnippetAcceptingContext;
use Drupal\DrupalExtension\Context\RawDrupalContext;
/**
 * Defines application features from the specific context.
 */
class FeatureContext extends RawDrupalContext implements SnippetAcceptingContext {
  /**
   * Initializes context.
   *
   * Every scenario gets its own context instance.
   * You can also pass arbitrary arguments to the
   * context constructor through behat.yml.
   */
  public function __construct()
  {
  }
  /**
   * @BeforeStep
   */
  public function beforeEachStep($event) {
  }
  /**
   * @AfterStep
   */
  public function afterEachStep($event) {
  }
}
This is the place where you can write your own step definitions and hook into the default behaviour of Behat. Full documentation can be found over at Behat and you may want to go there to learn all the details of what you specifically require.
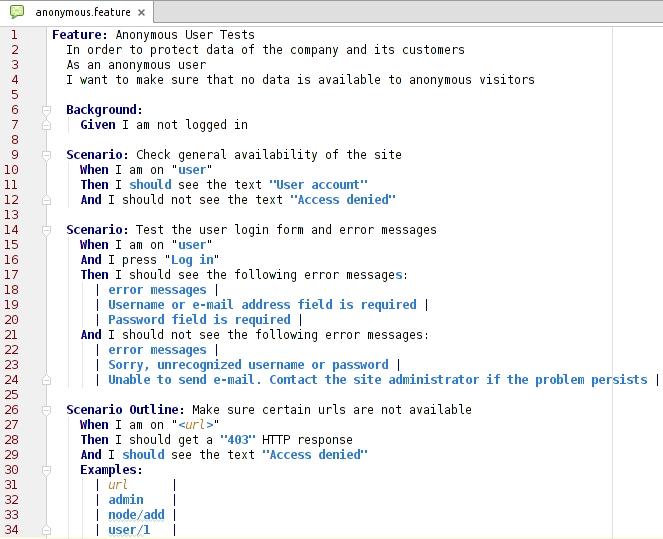
Features in basic/anonymous.feature
Feature: Anonymous User Tests
  In order to protect data of the company and its customers
  As an anonymous user
  I want to make sure that no data is available to anonymous visitors

  Background:
    Given I am not logged in

  Scenario: Check general availability of the site
    When I am on "user"
    Then I should see the text "User account"
    And I should not see the text "Access denied"

  Scenario: Test the user login form and error messages
    When I am on "user"
    And I press "Log in"
    Then I should see the following error messages:
      | error messages |
      | Username or e-mail address field is required |
      | Password field is required |
    And I should not see the following error messages:
      | error messages |
      | Sorry, unrecognized username or password |
      | Unable to send e-mail. Contact the site administrator if the problem persists |

  Scenario Outline: Make sure certain urls are not available
    When I am on "[url]"
    Then I should get a "403" HTTP response
    And I should see the text "Access denied"
    Examples:
      | url      |
      | admin    |
      | node/add |
      | user/1   |
A sample feature file to define a first set of scenarios of what you would most probably want to test on each Drupal site. Just a quick starter file but those tests are already essential to make sure your Drupal site is not misconfigured. In all the other directories you can now start and write any number of feature files with everything included of what you want to test. Just wondering if the community shouldn't start collaborating on a basic set of tests - but that's content for another discussion elsewhere I guess.
Other useful tool when getting started with Behat and Drupal
Generate environment variables for the Behat Drupal Extension
There is a nice feature in Behat that allows to omit certain parts from the behat.yml configuration file and instead define those parts with a $BEHAT_PARAMS environment variable. That variable is expected to be a one line json string and could for example contain the base URL or the Drupal root path. As it is pretty difficult to define such an environment variable by hand, there is a tool for that: Drush command bde_env_gen.
Debugging Features
OK, it's possible to debug PHP cli applications with XDebug and PhpStorm, but that may be difficult and maybe doesn't even meet your requirement, as you don't want to debug the Behat application but you want to see what's happening with your Drupal site while stepping through the features and scenarios. This is what the Behat Step Through Extension is there fore. When enabled, Behat will stop after each step and waits for you to confirm that it should continue. That allows you in the meantime for as long as you require, to check the context of the website, logs, the file system or the database before Behat continues testing with the next step.
Documenting your site based on your tests
And last but not least, if your tests are a comprehensive description on how visitors, editors, administrators and other roles are intended to be using your website, then that also sounds like a full documentation on the project that you want to hand out to your customer. It describes on what the user of the site is supposed to be doing and what he or she should expect from the site in response. Well, yes but the feature files - although they are plain text and descriptive - it's still not a format you would hand over to project managers or even C-level executives. The answer to bridge this gap is our final recommendation for today, FeatureBrowser. This is a tool that parses your features and turns them into a documentation website in HTML format which everyone can easily navigate and explore. And as you're getting this for free in addition to all your tests, you may want to give this a try too.
You got this far and still reading? Respect, you're really interested. We hope you're enjoying what you've found here and we really welcome your feedback, suggestions and criticisms in the comments below.
Useful Links
- Used projects
- Behat: https://github.com/Behat/Behat
- Behat Documentation: http://docs.behat.org/en/v3.0
- Drupal Extension: https://www.drupal.org/project/drupalextension
- Drupal Extension Documentation: https://behat-drupal-extension.readthedocs.org/en/3.0/index.html
- StepThrough Extension: https://github.com/ciaranmcnulty/behat-stepthroughextension
- Generate Environment Variables: https://github.com/pfrenssen/drush-bde-env
- Generate Test Documentation: https://github.com/FeatureBrowser/FeatureBrowser
- Tutorials
- Behat in PhpStorm: http://blog.jetbrains.com/phpstorm/2014/07/using-behat-in-phpstorm
Add new comment